Spring Cloud 微服务配置中心(cloud config)
Spring Cloud Config为分布式系统中的外部化配置提供服务器和客户端支持,使用Config Server可以集中管理所有环境中应用程序的外部属性。
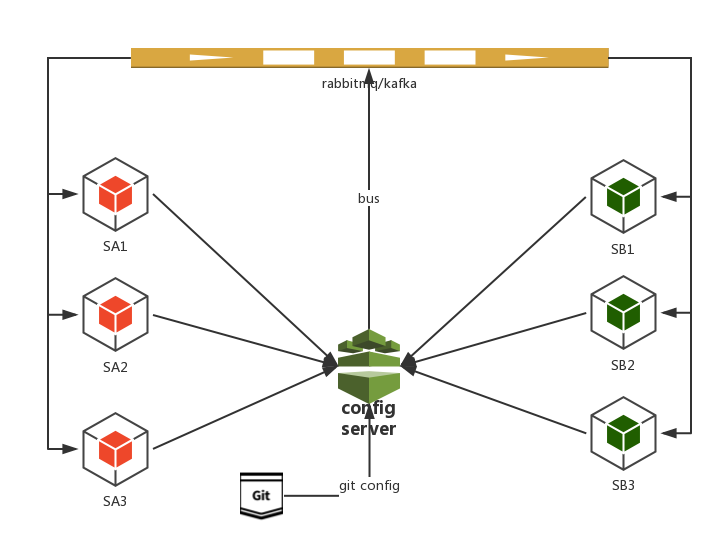 流程:
流程:
- 服务启动时从本地配置获取config server的地址,或者通过注册中心获取config server地址。
- 调用config提供的接口获取配置
- 如果git仓库有修改,
POST请求config server的/bus/refresh接口,config通过消息总线通知服务节点 - 服务节点接到通知后,重新到config获取新配置。
说明:
- 第3点提到的
POST请求可以通过git的hook功能实现。- 为实现高可用,config server集群注册到Eureka等注册中心。
- 更新配置可以具体到某一个服务。
一、服务端
1.1 搭建config server
1.1.1 pom.xml添加依赖:
<dependency>
    <groupId>org.springframework.cloud</groupId>
    <artifactId>spring-cloud-config-server</artifactId>
</dependency>
<dependency>
    <groupId>org.springframework.cloud</groupId>
    <artifactId>spring-cloud-starter-eureka</artifactId>
</dependency>
<dependency>
    <groupId>org.springframework.cloud</groupId>
    <artifactId>spring-cloud-starter-bus-amqp</artifactId>
</dependency>
1.1.2 boot 启动main方法
添加@EnableConfigServer,并且把配置中心作为一个服务注册到eureka@EnableDiscoveryClient,如下:
@EnableConfigServer
@SpringBootApplication
@EnableDiscoveryClient
public class ConfigApplication {
    public static void main(String[] args) {
        SpringApplication.run(ConfigApplication.class, args);
    }
}
1.1.3 配置
aapplication.properties
spring.application.name=config-server
server.port=9000

# git 仓库地址
spring.cloud.config.server.git.uri=https://github.com/ThoreauZZ/spring-cloud-example.git
# 也可以配置本地仓库
#spring.cloud.config.server.git.uri=file:///${user.home}/config-repo
# 配置文件搜索路径
spring.cloud.config.server.git.searchPaths=config-repo
#注册中心地址
eureka.client.serviceUrl.defaultZone=http://discovery:9001/eureka/
# 使用bus作配置变更通知
spring.rabbitmq.host=rabbitmq
spring.rabbitmq.port=5672
spring.rabbitmq.username=guest
spring.rabbitmq.password=guest
spring.rabbitmq.virtualHost=/
如上配置,在config-repo下新建几个文件: application.properties
spring.rabbitmq.host=rabbitmq
spring.rabbitmq.port=5672
spring.rabbitmq.username=guest
spring.rabbitmq.password=guest
spring.rabbitmq.virtualHost=/
eureka.client.serviceUrl.defaultZone=http://discovery:9001/eureka/
user-service-dev.properties
server.port = 9002
spring.datasource.url=jdbc:mysql://db:3306/springcloud?useUnicode=true&characterEncoding=UTF-8
spring.datasource.username=root
spring.datasource.password=1234
spring.datasource.driver-class-name=com.mysql.jdbc.Driver
spring.datasource.type=com.alibaba.druid.pool.DruidDataSource
启动:
1.2 服务端提供的REST API
$ curl -s http://localhost:9000/user-service/dev |jq .
{
  "name": "user-service",
  "profiles": [
    "dev"
  ],
  "label": "master",
  "version": "6d2c48d687e9b9857f15e5e92d8c7c2ea0f73386",
  "state": null,
  "propertySources": [
    {
      "name": "https://github.com/ThoreauZZ/spring-cloud-example.git/config-repo/user-service-dev.properties",
      "source": {
        "spring.datasource.driver-class-name": "com.mysql.jdbc.Driver",
        "spring.datasource.username": "root",
        "server.port": "9002",
        "spring.datasource.password": "1234",
        "spring.datasource.url": "jdbc:mysql://db:3306/springcloud?useUnicode=true&characterEncoding=UTF-8",
        "spring.datasource.type": "com.alibaba.druid.pool.DruidDataSource"
      }
    },
    {
      "name": "https://github.com/ThoreauZZ/spring-cloud-example.git/config-repo/application.properties",
      "source": {
        "spring.rabbitmq.password": "guest",
        "spring.rabbitmq.port": "5672",
        "spring.rabbitmq.host": "rabbitmq",
        "spring.rabbitmq.virtualHost": "/",
        "spring.rabbitmq.username": "guest",
        "spring.sleuth.sampler.percentage": "1.0",
        "logging.level.org,springframework.cloud.sleuth": "DEBUG"
      }
    }
  ]
}
从返回的json可以看出,propertySources不仅读取user-service-dev.properties,还读取了application.properties。
curl -s http://localhost:9000/trade-service/dev |jq .
{
  "name": "trade-service",
  "profiles": [
    "dev"
  ],
  "label": "master",
  "version": "6d2c48d687e9b9857f15e5e92d8c7c2ea0f73386",
  "state": null,
  "propertySources": [
    {
      "name": "https://github.com/ThoreauZZ/spring-cloud-example.git/config-repo/application.properties",
      "source": {
        "spring.rabbitmq.password": "guest",
        "spring.rabbitmq.port": "5672",
        "spring.rabbitmq.host": "rabbitmq",
        "spring.rabbitmq.virtualHost": "/",
        "spring.rabbitmq.username": "guest",
        "spring.sleuth.sampler.percentage": "1.0",
        "logging.level.org,springframework.cloud.sleuth": "DEBUG"
      }
    }
  ]
}
git仓库并没有文件trade-service-dev.properties,说明去读application.properties,共享配置项。
对user-service-dev.properties的访问方式:
curl -s http://localhost:9000/trade-service/dev |jq .
curl -s http://localhost:9000/trade-service-dev.properties
curl -s http://localhost:9000/trade-service-dev.json | jq .
curl -s http://localhost:9000/trade-service-dev.yml
HTTP服务资源的构成:
/{application}/{profile}[/{label}]
/{application}-{profile}.yml
/{label}/{application}-{profile}.yml
/{application}-{profile}.properties
/{label}/{application}-{profile}.properties
- {application}:对应客户端的
spring.application.name属性; - {profile}:对应客户端的
spring.profiles.active属性(逗号分隔的列表); - {label}:对应服务端属性配置文件的版本。对应git是:提交id,分支名称或tag。
优先级:
- profiles的优先级高于defaults,有多个profiles,最后一个起作用。
/{application}/{profile}[/{label}]优先级高于application.properties。
1.3 模式匹配和多资源库
//TODO
1.4 文件系统
GIT做文件系统,会被clone到本地文件系统中,默认这些文件会被放置到以config-repo-为前缀的系统临时目录,在 linux 上应该是 /tmp/config-repo-目录,通过设置spring.cloud.config.server.git.basedir参数值为非系统临时目录。 Config Server中,还有一种从本地classpath 或文件系统中加载配置文件的方式,可以通过spring.cloud.config.server.native.searchLocations进行设置
二、客户端
2.1 示例
pom.xml
 <dependency>
    <groupId>org.springframework.cloud</groupId>
    <artifactId>spring-cloud-starter-eureka</artifactId>
</dependency>
<dependency>
    <groupId>org.springframework.cloud</groupId>
    <artifactId>spring-cloud-starter-config</artifactId>
</dependency>
<dependency>
    <groupId>org.springframework.cloud</groupId>
    <artifactId>spring-cloud-starter-bus-amqp</artifactId>
</dependency>
bootstrap.properties
- 配置中心url或者注册中心相关配置要放在
bootstrap.properties(启动阶段的上下文) - spring.cloud.config.name不配置时,默认取spring.application.name
spring.application.name=user-service
# config
spring.profiles.active=dev
spring.cloud.config.failFast=true
spring.cloud.config.discovery.enabled=true
spring.cloud.config.discovery.serviceId=config-server
# discovery
eureka.client.serviceUrl.defaultZone=http://discovery:9001/eureka/
推荐解构:
project_name-|
    |-src/main/java
    |-src/main/resouces
        |- bootstrap.properties
        |- spring-logback.xml
spring.application.name=name# 环境不变
spring.profiles.active=dev # 启动修改
spring.cloud.config.discovery.serviceId=config-server #尽量环境不变
# 注册中心根据profile区分环境。
eureka.client.serviceUrl.defaultZone=http://discovery-${spring.profiles.active}:9001/eureka/
这样,就不需要专门维护bootstrap.properties。根据profile找注册中心,注册中心根据configId找配置中心,在配置中心获取环境相关配置。
2.2 消息通知
服务端:9000 客户端:9002
curl -s http://localhost:9002/configprops |jq '."spring.datasource-org.springframework.boot.autoconfigure.jdbc.DataSourceProperties"|{url:.properties.url,username: .properties.username}'
返回:
{
  "url": "jdbc:mysql://db:3306/springcloud?useUnicode=true&characterEncoding=UTF-8",
  "username": "root"
}
修改git文件,把jdbc的username改成root1234,提交,并请求服务端/bus/refresh
curl -X POST http://localhost:9000/bus/refresh
再请求9002返回:
{
  "url": "jdbc:mysql://db:3306/springcloud?useUnicode=true&characterEncoding=UTF-8",
  "username": "root1234"
}
说明修改并通知成功。
2.3 spring 提供的几个接口
2.3.1 /env
`/env 是spring-boot-starter-actuator提供的一个接口,GET方法调用可以查看系统环境变量,POST调用可以更改环境变量的值。这种方式修改的变量值具有最最高优先级。
curl -X POST http://localhost:9002/env -d spring.datasource.username=root
如果要求post修改失效,需要调另一个接口:
curl -X POST http://localhost:9002/refresh
重置变量
curl -X POST http://localhost:8080/env/reset
2.3.2 /refresh
使@RefreshScope修饰的bean类在下次调用时重新载入配置。
2.3.3 /bus/env和 /bus/refresh
作用同上,区别是会对所有节点生效,使用消息总线。