Kubernetes部署DNS和Dashboard
一、部署DNS
k8s的github 有很多组件的安装文档,但是,安装需要核对自己的k8s版本,找到对应版本的github,否则安装过程中会有很多问题。
本文k8s机器基于kubernetes1.5.x + centos集群,安装方式见:Centos7搭建kubernetes搭建
安装
获取/cluster/addons/dns/kubedns-controller.yaml.sed, 修改domain和镜像(如果能翻墙,可以不修改镜像)。 dns 基础配置:
$DNS_DOMAIN=cluster.local
$DNS_SERVER_IP=10.254.0.100
deployment文件skydns-rc.yaml如下:
apiVersion: extensions/v1beta1
kind: Deployment
metadata:
  name: kube-dns
  namespace: kube-system
  labels:
    k8s-app: kube-dns
    kubernetes.io/cluster-service: "true"
spec:
  # replicas: not specified here:
  # 1. In order to make Addon Manager do not reconcile this replicas parameter.
  # 2. Default is 1.
  # 3. Will be tuned in real time if DNS horizontal auto-scaling is turned on.
  strategy:
    rollingUpdate:
      maxSurge: 10%
      maxUnavailable: 0
  selector:
    matchLabels:
      k8s-app: kube-dns
  template:
    metadata:
      labels:
        k8s-app: kube-dns
      annotations:
        scheduler.alpha.kubernetes.io/critical-pod: ''
        scheduler.alpha.kubernetes.io/tolerations: '[{"key":"CriticalAddonsOnly", "operator":"Exists"}]'
    spec:
      containers:
      - name: kubedns
        # image: gcr.io/google_containers/kubedns-amd64:1.9
        image: registry.cn-hangzhou.aliyuncs.com/google-containers/kubedns-amd64:1.9
        resources:
          # TODO: Set memory limits when we've profiled the container for large
          # clusters, then set request = limit to keep this container in
          # guaranteed class. Currently, this container falls into the
          # "burstable" category so the kubelet doesn't backoff from restarting it.
          limits:
            memory: 170Mi
          requests:
            cpu: 100m
            memory: 70Mi
        livenessProbe:
          httpGet:
            path: /healthz-kubedns
            port: 8080
            scheme: HTTP
          initialDelaySeconds: 60
          timeoutSeconds: 5
          successThreshold: 1
          failureThreshold: 5
        readinessProbe:
          httpGet:
            path: /readiness
            port: 8081
            scheme: HTTP
          # we poll on pod startup for the Kubernetes master service and
          # only setup the /readiness HTTP server once that's available.
          initialDelaySeconds: 3
          timeoutSeconds: 5
        args:
        # - --domain=cluster.local.
        - --domain=cluster.local.
        - --dns-port=10053
        - --config-map=kube-dns
        # This should be set to v=2 only after the new image (cut from 1.5) has
        # been released, otherwise we will flood the logs.
        - --v=2
        - --kube-master-url=http://192.168.99.100:8080 # 指定api
        env:
        - name: PROMETHEUS_PORT
          value: "10055"
        ports:
        - containerPort: 10053
          name: dns-local
          protocol: UDP
        - containerPort: 10053
          name: dns-tcp-local
          protocol: TCP
        - containerPort: 10055
          name: metrics
          protocol: TCP
      - name: dnsmasq
        # image: gcr.io/google_containers/kube-dnsmasq-amd64:1.4.1
        image: registry.cn-hangzhou.aliyuncs.com/google-containers/kube-dnsmasq-amd64:1.4
        livenessProbe:
          httpGet:
            path: /healthz-dnsmasq
            port: 8080
            scheme: HTTP
          initialDelaySeconds: 60
          timeoutSeconds: 5
          successThreshold: 1
          failureThreshold: 5
        args:
        - --cache-size=1000
        - --no-resolv
        - --server=127.0.0.1#10053
        # - --log-facility=-
        ports:
        - containerPort: 53
          name: dns
          protocol: UDP
        - containerPort: 53
          name: dns-tcp
          protocol: TCP
        # see: https://github.com/kubernetes/kubernetes/issues/29055 for details
        resources:
          requests:
            cpu: 150m
            memory: 10Mi
      - name: dnsmasq-metrics
        # image: gcr.io/google_containers/dnsmasq-metrics-amd64:1.0.1
        image: registry.cn-hangzhou.aliyuncs.com/google-containers/dnsmasq-metrics-amd64:1.0
        livenessProbe:
          httpGet:
            path: /metrics
            port: 10054
            scheme: HTTP
          initialDelaySeconds: 60
          timeoutSeconds: 5
          successThreshold: 1
          failureThreshold: 5
        args:
        - --v=2
        - --logtostderr
        ports:
        - containerPort: 10054
          name: metrics
          protocol: TCP
        resources:
          requests:
            memory: 10Mi
      - name: healthz
        # image: gcr.io/google_containers/exechealthz-amd64:1.2
        image: registry.cn-hangzhou.aliyuncs.com/google-containers/exechealthz-amd64:1.2
        resources:
          limits:
            memory: 50Mi
          requests:
            cpu: 10m
            # Note that this container shouldn't really need 50Mi of memory. The
            # limits are set higher than expected pending investigation on #29688.
            # The extra memory was stolen from the kubedns container to keep the
            # net memory requested by the pod constant.
            memory: 50Mi
        args:
        - --cmd=nslookup kubernetes.default.svc.cluster.local 127.0.0.1 >/dev/null
        - --url=http://thoreauz.com/healthz-dnsmasq
        - --cmd=nslookup kubernetes.default.svc.cluster.local 127.0.0.1:10053 >/dev/null
        - --url=http://thoreauz.com/healthz-kubedns
        - --port=8080
        - --quiet
        ports:
        - containerPort: 8080
          protocol: TCP
      dnsPolicy: Default  # Don't use cluster DNS.
修改service文件skydns-svc.yaml:
apiVersion: v1
kind: Service
metadata:
  name: kube-dns
  namespace: kube-system
  labels:
    k8s-app: kube-dns
    kubernetes.io/cluster-service: "true"
    kubernetes.io/name: "KubeDNS"
spec:
  selector:
    k8s-app: kube-dns
  # clusterIP: $DNS_SERVER_IP
  clusterIP: 10.254.0.100
  ports:
  - name: dns
    port: 53
    protocol: UDP
  - name: dns-tcp
    port: 53
    protocol: TCP
启动
kubectl create -f  skydns-rc.yaml
kubectl create -f  skydns-svc.yaml
修改各个node节点的kubelet配置并重启:
vim /etc/kubernetes/kubelet
# 添加这一行
KUBELET_ARGS="--cluster_dns=10.254.0.100 --cluster_domain=cluster.local"
systemctl restart kubelet
验证
cat nginx-deploy.yaml
apiVersion: extensions/v1beta1
kind: Deployment
metadata:
  name: nginx-deployment
spec:
  replicas: 2 # tells deployment to run 2 pods matching the template
  template: # create pods using pod definition in this template
    metadata:
      labels:
        app: nginx
    spec:
      containers:
      - name: nginx
        image: nginx:1.7.9
        ports:
        - containerPort: 80
启动查看
$ kubectl create -f nginx-deploy.yaml
nginx-deployment-4087004473-k35hw   1/1       Running   0          10m
nginx-deployment-4087004473-z081c   1/1       Running   0          10m
cat nginx-svc.yaml
apiVersion: v1
kind: Service
metadata:
  name: nginx
spec:
  ports:
  - port: 80
    protocol: TCP
  selector:
    app: nginx
$ kubectl create -f nginx-svc.yaml
$ kubectl get svc
NAME         CLUSTER-IP       EXTERNAL-IP   PORT(S)   AGE
kubernetes   10.254.0.1       <none>        443/TCP   4d
nginx        10.254.126.209   <none>        80/TCP    2h
现在,部署了nginx pods和对应的service,启动一个容器测试下:
$ kubectl run curl --image=radial/busyboxplus:curl -i --tty
[ root@curl-2421989462-w9lhz:/ ]$ cat /etc/resolv.conf
search default.svc.cluster.local svc.cluster.local cluster.local DHCP
nameserver 10.254.0.100
nameserver 10.0.2.3
options ndots:5

[ root@curl-2421989462-w9lhz:/ ]$ nslookup nginx
Server:    10.254.0.100
Address 1: 10.254.0.100 kube-dns.kube-system.svc.cluster.local

Name:      nginx
Address 1: 10.254.126.209 nginx.default.svc.cluster.local

[ root@curl-2421989462-w9lhz:/ ]$ curl nginx
<!DOCTYPE html>
<html>
<head>
<title>Welcome to nginx!</title>
<style>
    body {
        width: 35em;
        margin: 0 auto;
        font-family: Tahoma, Verdana, Arial, sans-serif;
    }
</style>
</head>
<body>
<h1>Welcome to nginx!</h1>
<p>If you see this page, the nginx web server is successfully installed and
working. Further configuration is required.</p>

<p>For online documentation and support please refer to
<a href="http://nginx.org/">nginx.org</a>.<br/>
Commercial support is available at
<a href="http://nginx.com/">nginx.com</a>.</p>

<p><em>Thank you for using nginx.</em></p>
</body>
</html>
至此,dns部署成功。可以做服务发现,比如新加一个nginx pod,可以直接访问service name nginx 作负载均衡转发给对应pod。
二、部署Dashboard
wget https://rawgit.com/kubernetes/dashboard/master/src/deploy/kubernetes-dashboard.yaml
修改
 args:
          - --apiserver-host=http://192.168.99.100:8080
启动
$ kubectl create -f kubernetes-dashboard.yaml
$ kubectl get po -n kube-system
NAME                                    READY     STATUS             RESTARTS   AGE
kube-dns-1607457672-0bmxp               4/4       Running            8          1d
kubernetes-dashboard-3697257891-h2fcx   1/1       Running            2          20h
$ kubectl get svc -n kube-system
NAME CLUSTER-IP EXTERNAL-IP PORT(S) AGE
kube-dns 10.254.0.100 <none> 53/UDP,53/TCP 2d
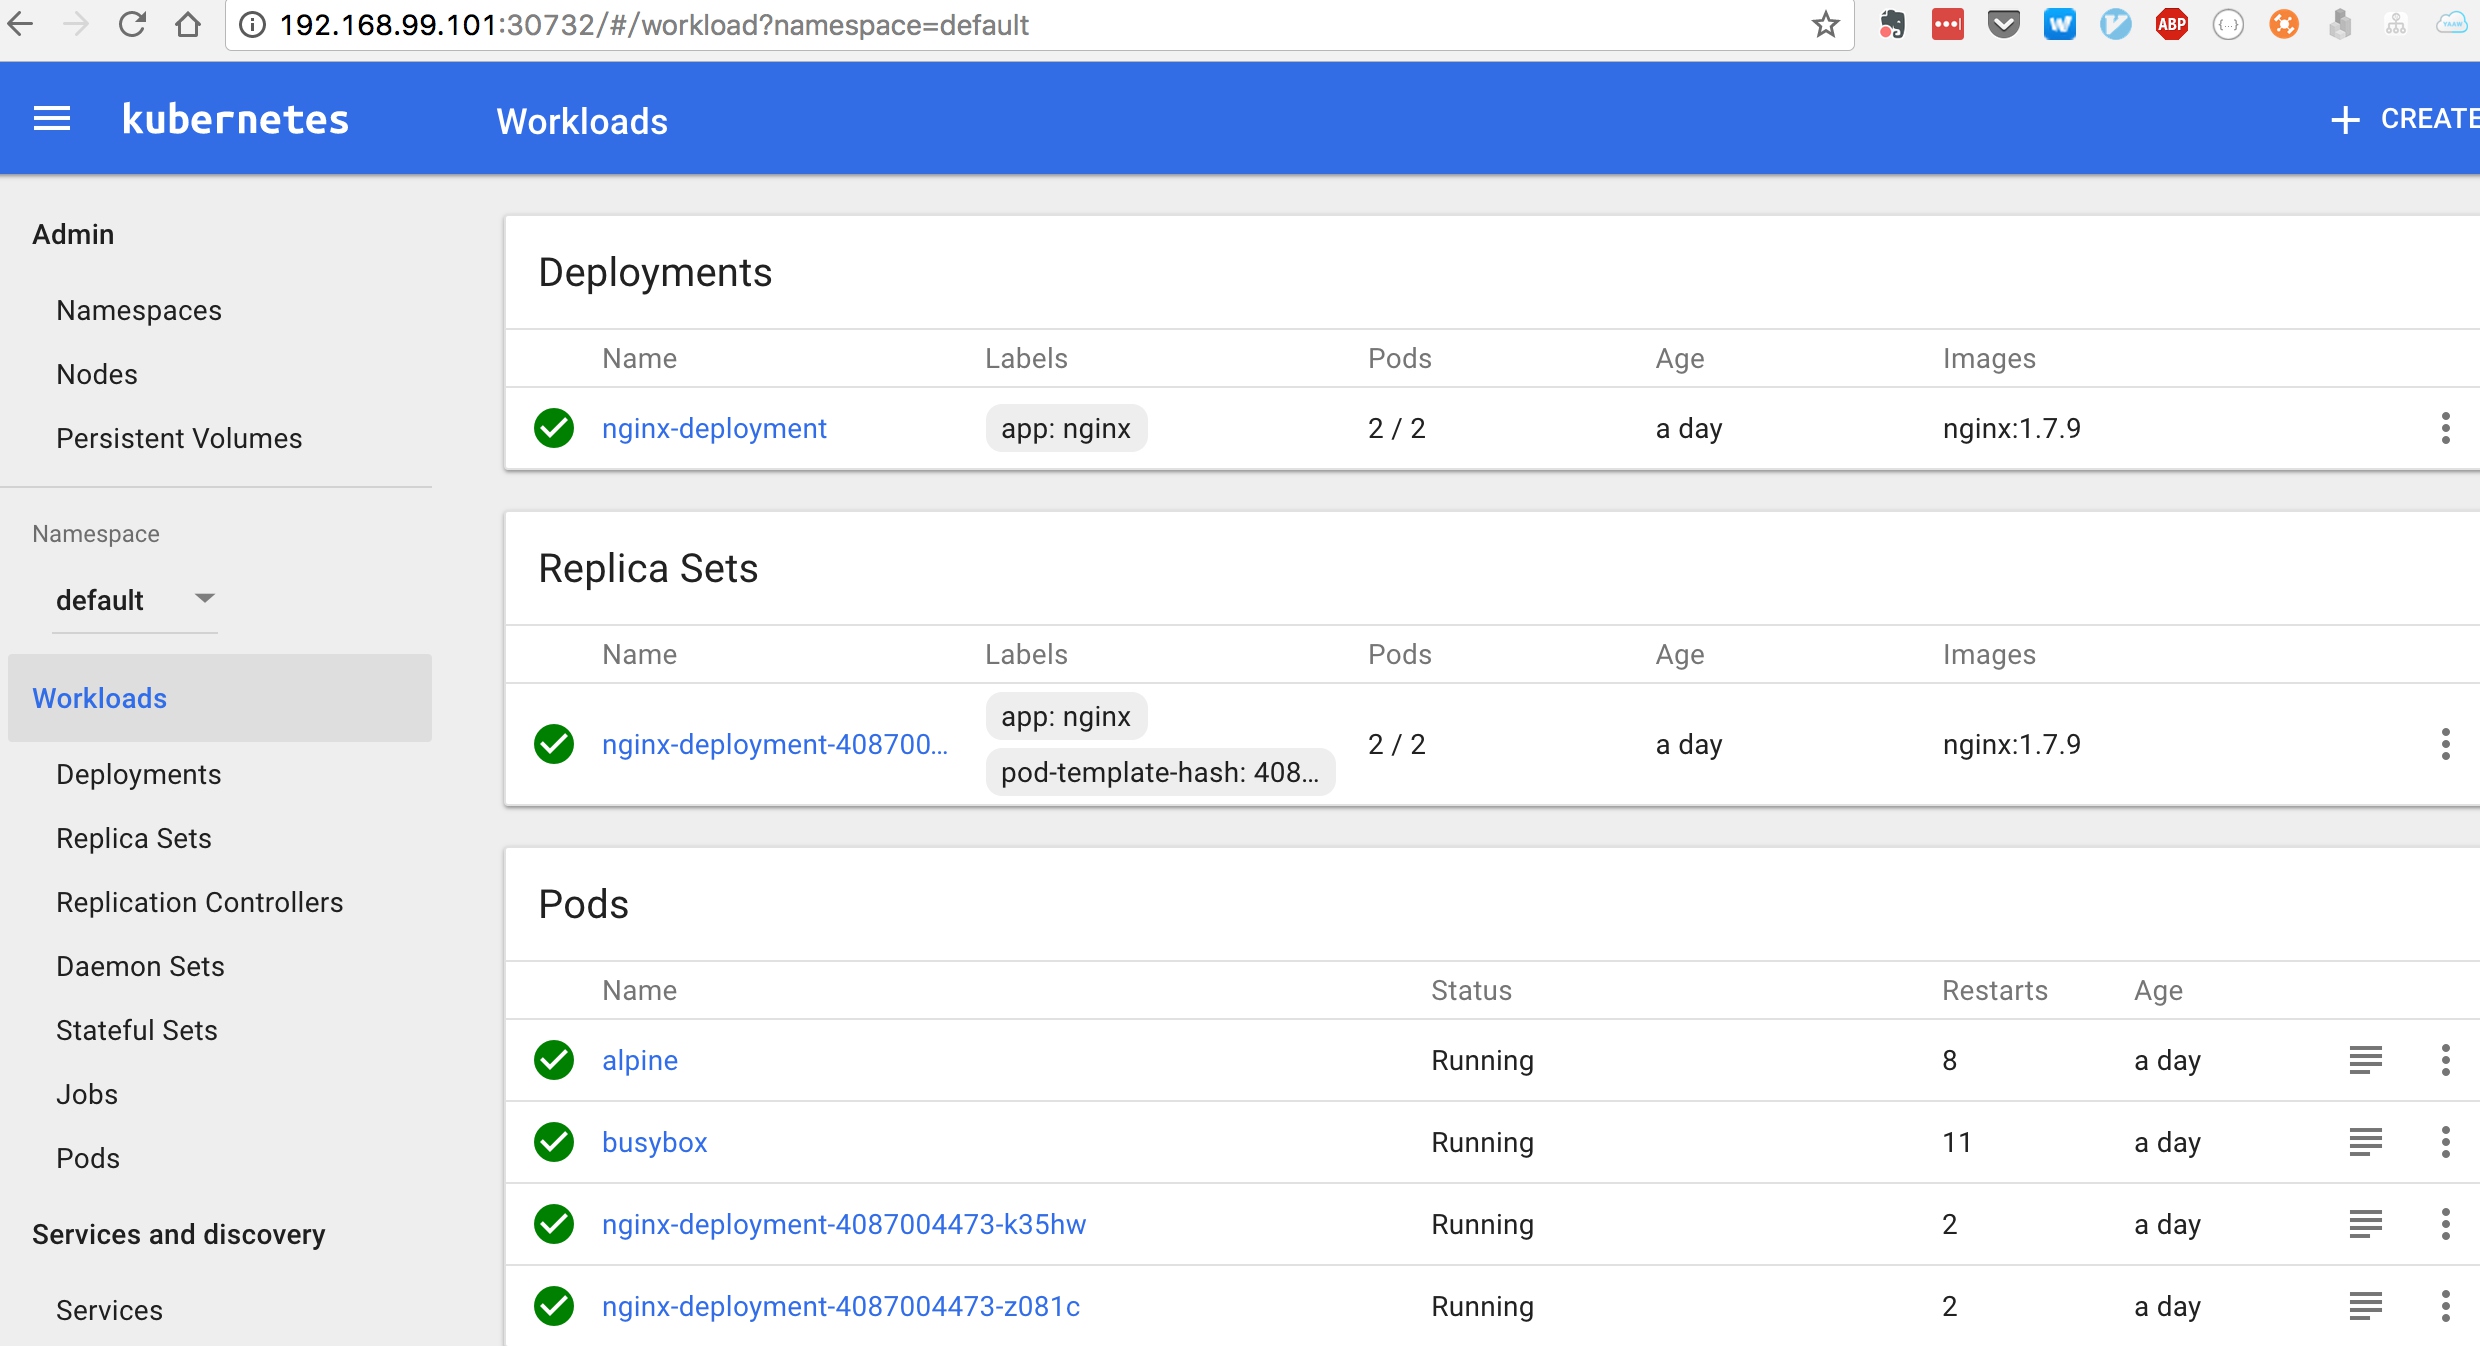
kubernetes-dashboard 10.254.224.65 <nodes> 80:30732/TCP 20h
浏览器访问http://nodeIP:30732
但是,每次重启kubernetes-dashboard,CLUSTER-IP和PORT都会变,为了方便暴露给外部访问,可以结合DNS使用。
编辑任意一个node的/etc/resolv.conf,添加nameserver
search default.svc.cluster.local svc.cluster.local cluster.local DHCP
nameserver 10.254.0.100
修改kube-proxy: /etc/kubernetes/proxy
KUBE_PROXY_ARGS="--cluster-cidr=172.30.0.0/16"
–cluster-cidr: 用于桥接来自群集外部的流量。 如果没有配置,则不执行群外桥接。
修改后重启kube-proxy,然后通过service name.namespace访问dashbord:
& curl kubernetes-dashboard.kube-system
 <!doctype html> <html ng-app="kubernetesDashboard"> <head> <meta charset="utf-8"> <title ng-controller="kdTitle as $ctrl" ng-bind="$ctrl.title()"></title> <link rel="icon" type="image/png" href="assets/images/kubernetes-logo.png"> <meta name="viewport" content="width=device-width"> <link rel="stylesheet" href="static/vendor.4f4b705f.css"> <link rel="stylesheet" href="static/app.93b90a74.css"> </head> <body> <!--[if lt IE 10]>
      <p class="browsehappy">You are using an <strong>outdated</strong> browser.
      Please <a href="http://browsehappy.com/">upgrade your browser</a> to improve your
      experience.</p>
    <![endif]--> <kd-chrome layout="column" layout-fill> </kd-chrome> <script src="static/vendor.6952e31e.js"></script> <script src="api/appConfig.json"></script> <script src="static/app.8a6b8127.js"></script> </body> </html>
这样,可以配置nginx代理。集群外就能访问dashboard,也不用担心虚拟ip和端口改变。
location / {
		proxy_set_header    Host    $host;
        proxy_set_header    X-Forwarded-For $proxy_add_x_forwarded_for;
	  	proxy_pass http://kubernetes-dashboard.kube-system;
        }
}